When I tell people what I do for a living, after the blank stares, and a brief explanation, they then ask me if I use a computer to do my art. "Is it all on computer?" Well, most everthing starts out on paper for me. I can draw faster, stay on concept and not get caught up in all the nifty things I can do with the computer/Wacom tablet. This is an example of the move from convetional to digital.
This is the sketch for the TRANSFOMERS skeleton, or chassis, done for the Robot Builder part of the toy's website. After spending a few hours scouring for the right scrap (photos of car chassis, engine bits, wheels struts and shock absorbers), I sat down at my drawing table and got busy! I was free to just kind of throw things down and create a really dynamic drawing with suggestions of things to be. I knew, after I scanned the image, it would be easy to clean up and fine tune, or machine things quite a bit, working from the same scrap photos. The red lines and the blue lines were done on separate sheets of tracing paper then overlayed. Why draw the lines in two colors, 'cause it looks cool! Then it's of to the clean, digital side of the basement.
This is the vector art. I used this Chassis as a register mark for all the TRANSFORMERS I created. The bits off to the side are robot parts that were used more than once. I just put them aside to grab when needed. (The most challeging bit to do was the Jeep tire). Somethng like this Chassis is much easier to finish on the computer, but the life and spark of it started on paper. I used a lot of neat tricks digitally to get the lines I wanted, creating brushes and expanding apperances. The Chassis wasn't used as intended, but the concept shows up as the selector icon on the left.
Yeah, super deal, I created 14 TRANSFORMERS from scatch! My art director, was great, backed me up and let me go. The parts are all at the website.click on Robot Builder. The sounds are a lot of fun also.
I normally don't like to draw cars, or machines. However working first loose on paper, playing with the pose, feeling, and concept makes the process fun and energetic. The computer makes keeping things even and machined, doing curves and angles much easier. The whole process can be enjoyable, using the right tool for the right job.
Monday, September 26, 2005
Friday, September 23, 2005
Feast of Love illustration
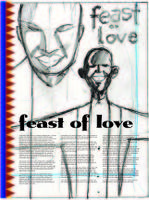
This is a rough rundown of how I work through an airbrushed illustration. The first step is the rough thumbnail. Here it is with type and side bar pattern put in by Colleen, my designer/art director/wife. No shit, she does all that and garden! Since her type sense is way better that mine, and we work back to back, It's for the best that she does the type at this point. The thumbnail is rough here, in my previous post you can view the sketch. Sketches are done to scale, very tight, so the designer can use them for placement. Saves time for both of us.
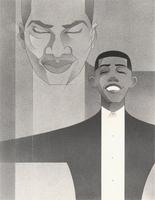
After the sketch is approved I go to the other side of the basement, the convetional art side, (with all my books and scavanged oak drawing table) and airbrush the art. I've been airbrushing for years, but still seem to learn something once and a while, or maybe I just have a really bad memory. In and event, I try to make a nice clean piece of art. This one came out beautifully.
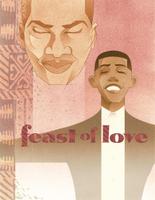
The last step is to come back over to the computer side of the basement, scan the art, and add color in Photoshop. This one went a bit further. I added the pattern from a shirt I scanned. I removed the side bar from the scan, and brought in more of the shirt pattern. It gaves the illo more depth, things don't look so stuck on.
Working for Black Issues Book Review is rewarding. I've worked with four art directors. Each one has given me room to really push what I want to do. One day I'll post the "Literary Blackface" project done for BIBR. Lots of sketches and research for a really fun series of illustrations.
More airbrushed illustration like this can be seen at this photo album.
Stan
Wednesday, September 21, 2005
He did what?
Live fast, draw hard.
I have yet to build a website, but one thing I wanted was some kind of forum, or format, that would allow me to talk about what I do (illustrate, yeah, I'm an illustrator). Several art directors have loved the stories about the illustrations in my portfolio. Others think I'm a walking Illustration encyclopedia, and I'd like to have an place for my students to read my lectures/thoughts/rants about illustration, instead of sitting/sleeping through them. Also, it might be fun, and a way to charge up my creative batteries.
In any event, welcome.
Stan Shaw
In any event, welcome.
Stan Shaw
Subscribe to:
Posts (Atom)